How to Run Solarkraft (Solarkraft #3)

» This is a guest post by Jure Kukovec.
This is the third in a series of blog posts introducing Solarkraft, a TLA+-based runtime monitoring solution for Soroban smart contracts. The first post, “A New Hope – Why Smart Contract Bugs Matter and How Runtime Monitoring Saves the Day” gives an overview of smart contracts, explains how traditional security fails to address major challenges in securing crypto assets, and introduces runtime monitoring as a solution. The second post, Guardians of the Blockchain: Small and Modular Runtime Monitors in TLA+ for Soroban Smart Contracts introduces the language of Solarkraft monitors.
Solarkraft has been developed in collaboration by Igor Konnov, Jure Kukovec, Andrey Kuprianov and Thomas Pani.
If you’ve read the previous posts, and are keen to start using Solarkraft, you’ve come to the right place. In this post, we’ll give you a detailed overview of the various features of Solarkraft, and explain how to use each one, step-by-step. We’ve recorded a short video demonstrating every command, which you can follow along as we give more details:
A two-minute demo
A ten-minute tutorial
Before we start
In order to use solarkraft, you need the following:
- The contract ID of a Soroban contract, deployed on the Stellar blockchain. Can be
mainnetortestnet - A TLA+ monitor tailored to the chosen contract
The Soroban admin guide explains how you can use the soroban cli to deploy your own contract. For details on how to write a monitor, and some examples, see Part 2 of our blogpost series.
Building solarkraft
Solarkraft is free and open-source, and you can find the GitHub repository here. To start, you’ll want to clone the repository, navigate to the solarkraft sub-directory, and follow these installation instructions.
After you’ve successfully installed solarkraft, you can use solarkraft –help to see a list of options:
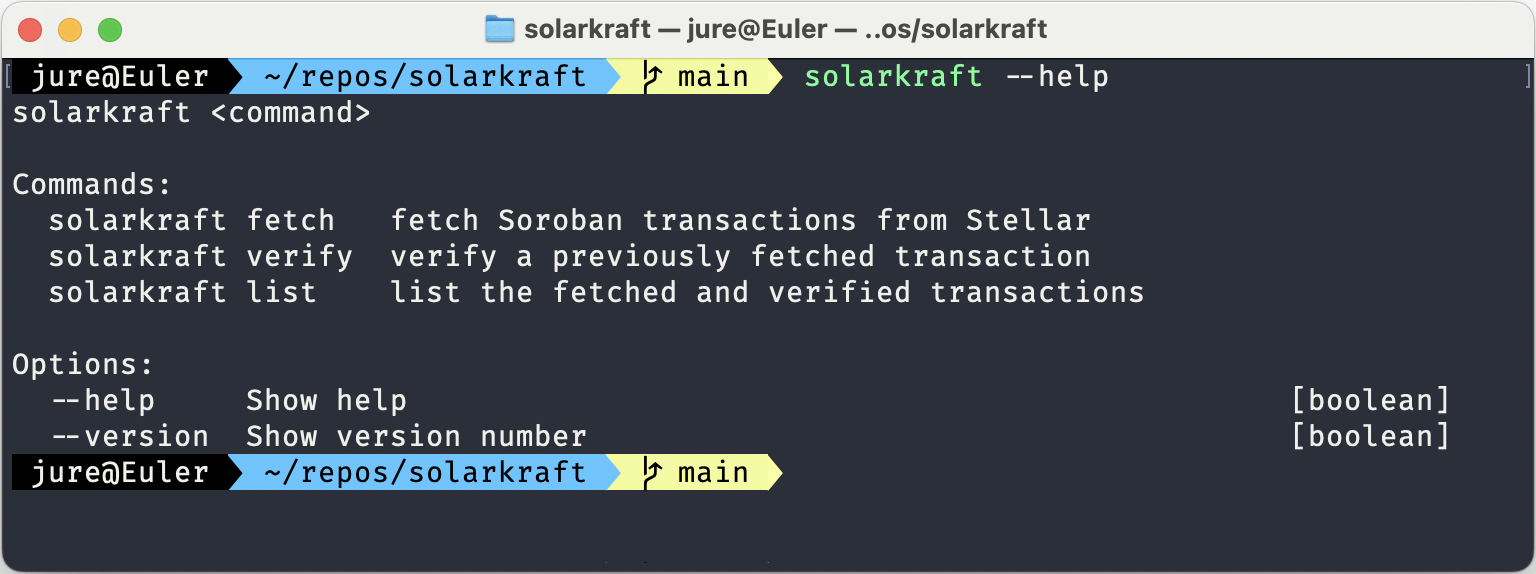
Solarkraft commands
Solarkraft has two main commands, fetch and verify, and an auxiliary command list. We will go over the details of each command separately.
Conceptually, the process of using Solarkraft can be broken down into two parts
- Data retrieval: Solarkraft collects information on all transactions related to a given contract ID, from a given point in time onward. It uses Stellar Horizon, which ingests and re-serves data produced by the Stellar network, to access historical and near-real time transaction data. This is done via the
solarkraft fetchcommand. - Transaction verification: Given transaction data, concretely the state of the data storage before and after the transaction was executed, as well as information about which smart contract function was invoked in that transaction, and with which parameters, we use a monitor specification to see whether the executed transaction satisfies the constraints specified in the monitor. This is done via the
solarkraft verifycommand.
Our approach allows us to do things asynchronously and modularly: we can fetch one transaction (or a collection of transactions) and reuse the obtained data as often as we like; verifying against multiple combinations of monitors, in sequence or in parallel.
Data retrieval: solarkraft fetch
The first step towards verification is obtaining the transaction data that we wish to verify, and fetch is the way to do that. If we look at the --help available, we can see a number of parameters to pass to solarkraft fetch:
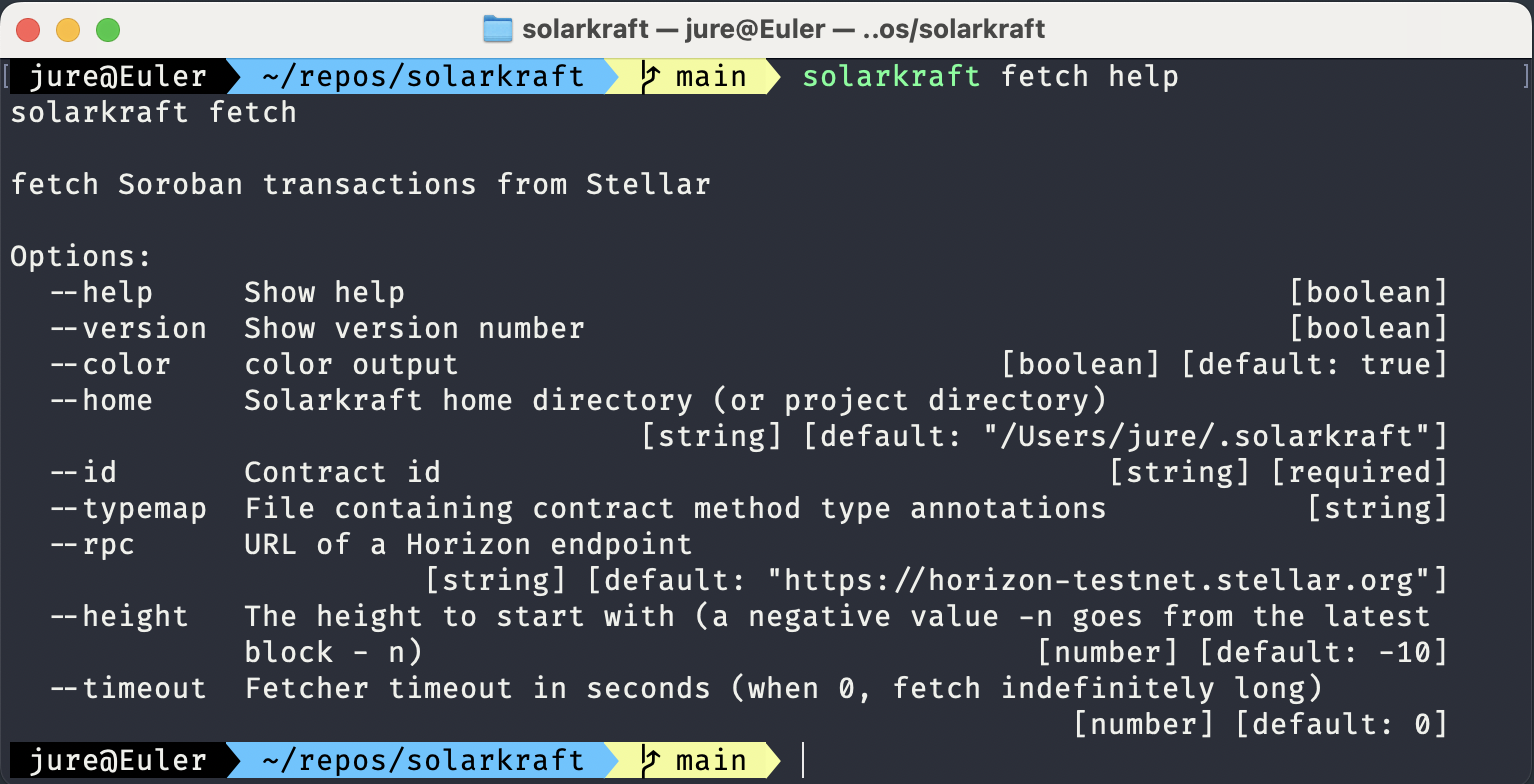
The first few are self-explanatory, so let’s focus on the critical ones:
id: This is a mandatory parameter, sincefetchwill only retrieve transactions related to the provided contract ID.typemap: For the present MVP, we focus on the core functionality and require user annotations. Because Apalache, the backend solver used insolarkraft verify, deals with typed TLA+, we need to provide type hints, whenever the types of values present in the transaction data are ambiguous.typemapaccepts a JSON file containing such type hints for method parameters and storage-values. A detailed description of the shape of this file can be found here, and an example can be found here. This parameter is always optional, but if omitted,verifymight be unable to continue, in which case you will be prompted tofetchagain, withtypemapspecified.rpc: The Horizon RPC URL. If your contract is deployed to the testnet, you don’t need to provide this, but you have to specify it otherwise.height: This parameter is mandatory, and specifies the minimum ledger height, from whichsolarkraft fetchwill attempt to retrieve all transactions related to the provided contract id.timeout: Unless provided,fetchwill indefinitely attempt to retrieve new transaction data as the ledger grows. The parameter should be used if you need to limitfetchexecution time (e.g. in automation). By default, you can keep it running in the background, if you’re interested in always keeping up-to-date transaction data for a specific contract.
Here’s an example of a solarkraft fetch command specifying some of the parameters:
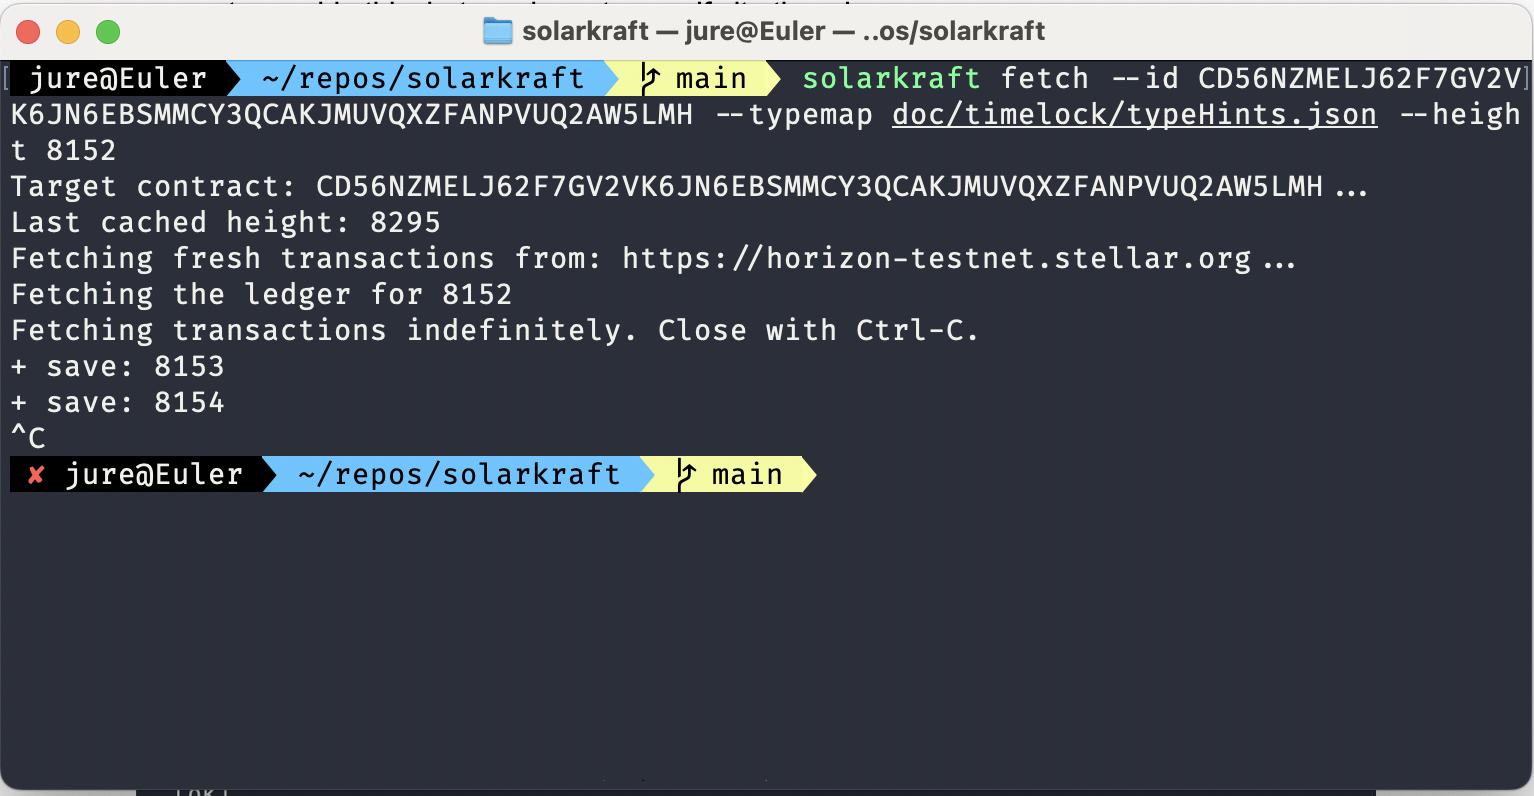
Observe that every time a transaction related to the contract id is found, fetch notifies us with a save: XYZ message. In the above case, we started at height 8152, and found two transactions in ledgers 8153 and 8154, before stopping the fetcher.
Data display: solarkraft list
In order to keep track of transactions we’ve fetched, and those we’ve verified, we can use list, to display the list of all transactions:
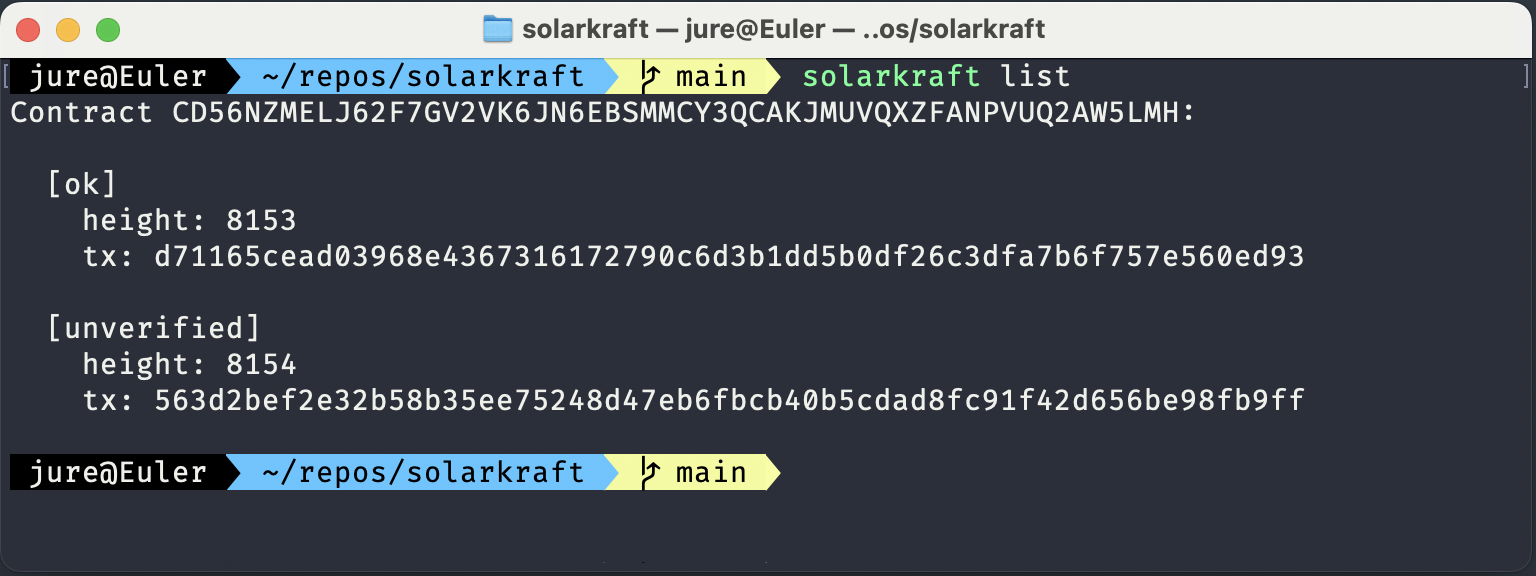
Note that if you’ve been strictly following this tutorial, both transactions should be marked as unverified. The above image is intended to give you a more general sense of the kind of output to expect from solarkraft list.
For each contract, and each transaction related to the contract, solarkraft list displays
- The verification status:
unverified, if no verification has been done yet,ok, if no property violations were found, w.r.t. the last monitor that was used tosolarkraft verifythis transaction, orfail, if the transaction violated one or more properties in the monitor. - The height at which this transaction was read.
- The transaction hash. This value is used as a parameter to
solarkraft verify.
If you’re working with multiple contracts at the same time, you can refine the listing by specifying a single contract id with --id; by default, it lists all transactions for all contracts.
Transaction verification: solarkraft verify
Assuming we’ve successfully used solarkraft fetch to grab a number of transactions, the next step is to verify them against the monitor(s). Much like fetch, solarkraft verify takes a number of parameters:
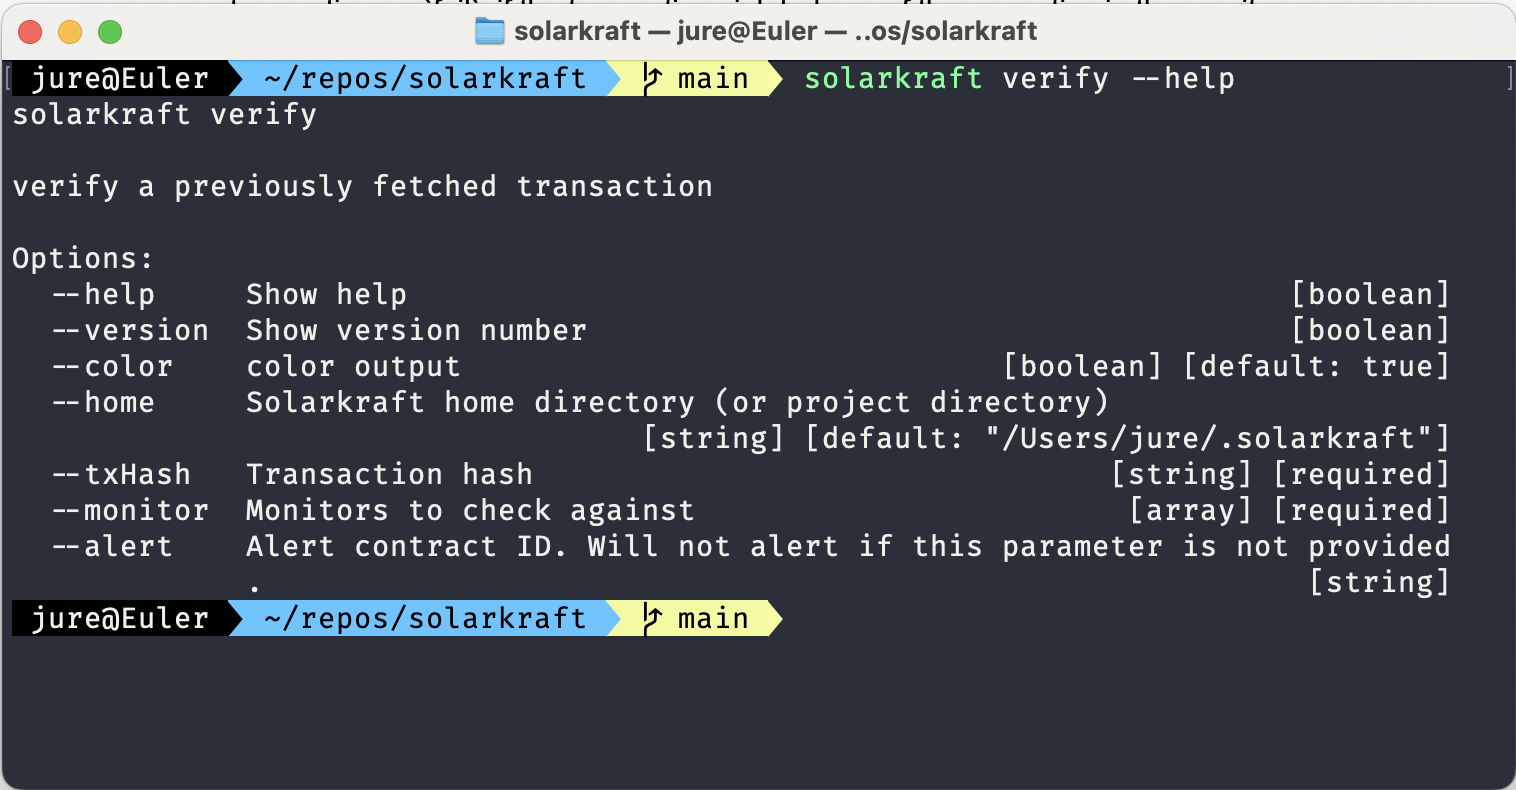
The critical ones are:
txHash: The hash of the transaction to be verified. We get this value by reading fromsolarkraft list.monitor: The TLA+ monitor file, which specifies our constraints. See [2] for more detail.alert: An optional parameter, which allows us to automatically submit a transaction to an alert contract deployed on the testnet after verification terminates, uploading whatever the result of verification was, and emitting an event if a property violation was found. More on this parameter later.
If you’re looking to verify a transaction locally and/or manually, and have no automation in place to respond to property violations, you only need to provide a hash and a monitor:
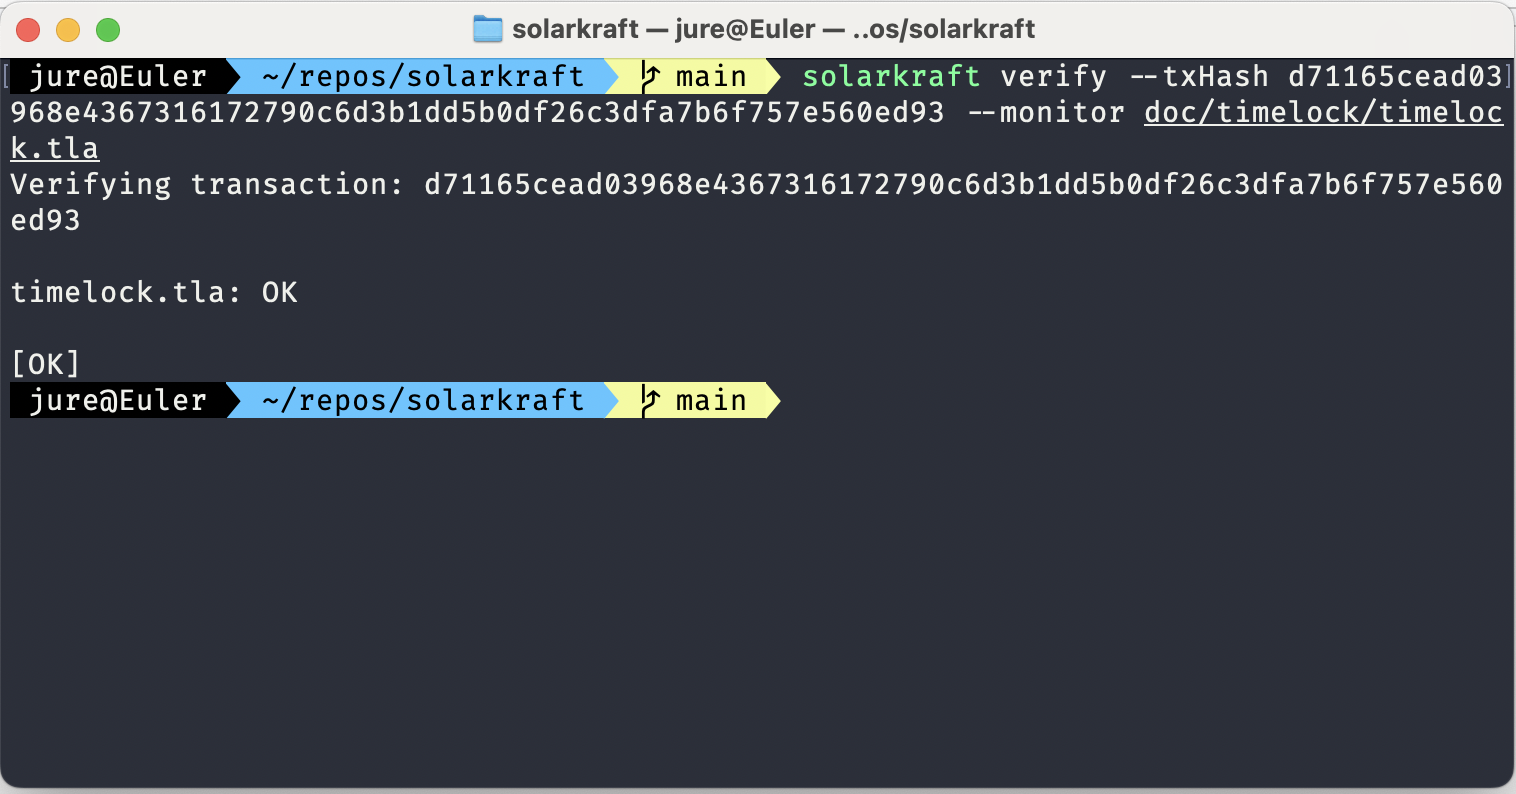
In this mode, you get notified of the verification result (which also gets stored, if you call solarkraft list later), and can respond to it accordingly.
Verification automation: --alert
Solarkraft provides you with some tools to facilitate automation. One of those is automatic verification-status submissions to an on-chain alert contract. The solarkraft repository offers an alert contract, which you can deploy on testnet (there is no mainnet alert support in the MVP).
If you call solarkraft verify --alert, and provide the contract ID of such an alert contract, the results of verification will automatically be submitted to it, and an event will be emitted, which you can listen for, and respond to, if you so choose.
Summary
fetchto grab the transaction data from the provided Horizon RPC, thenlist, to see which transactions you have already fetched, and what their verification statuses are, thenverifyto check the transaction data against the monitor specification, and--alert, if you want the verification results to get submitted on-chain automatically
What’s next?
Our final post will present a deep-dive into the topic of runtime monitoring; it will address forward and backward reasoning, “hybrid” monitors, and the circumstances in which either is appropriate and/or necessary.
Development of Solarkraft was supported by the Stellar Development Foundation with a generous Activation Award from the Stellar Community Fund of 50,000 USD in XLM.
If you want to pick up my brain for a few hours, drop me an email. After that, we can switch to a messenger of your choice (e.g., Signal, Telegram, or others) or have a call. For short consultations, I accept payments via Stripe. I also consider longer-term engagements (from weeks to months), which would require a contract. You can see my portfolio at konnov.phd. I am based in Austria (CET/CEST) and have experience working with clients from the US, UK, and EU.
The comments below are powered by GitHub discussions via Giscus. To leave a comment, either authorize Giscus, or leave a comment in the GitHub discussions directly.